As we all know, there’s nothing quite as good as homemade! And as that applies to Christmas gifts too, we thought it would be nice to bring you an article today describing how you can use photos of your little one to make truly special and personalized gifts for friends and family.
The following article was prepared for us by guest author Angela Colley from Money Crashers – we hope it inspires you to get creative with your gifts this year!
Like most crafty people, I love making homemade gifts for the holidays. Similar to homemade Christmas decorations and ornaments, handcrafted presents are personal, unique, and usually cheaper than most store-bought gifts.
And who doesn’t want to save money during the holidays?
I also enjoy taking photos, and, as any new parent can tell you, having a baby means a seemingly endless supply of adorable snapshots at your disposal.
Fortunately, homemade photo gifts make the best Christmas presents for friends and family members. The below three gifts were cheap to make and gave me a way to use baby photos for that personal touch.
3 Easy-to-Make Holiday Crafts
1. Baby’s First Scrapbook
Grandparents and godparents love to get scrapbooks showing the first few days of a new baby’s life. You can make a full scrapbook, or make one scrapbook page and place it in a frame.
- scrapbook paper (I used eight different patterned pages for this style)
- ribbon
- scissors
- glue (I prefer glue dots for scrapbooks – liquid glue can make a mess)
- baby photo
- embellishments (optional)
Directions:
- Decide on a layout for your scrapbook page. It helps to draw the layout on a piece of paper. For example, on my scrapbook page I drew a two-layer frame as seen in the photo. Then I drew a funky shape to place in the center of the page, and I added a place to put the photo on top of the shape. While I ended up adding more to the page as I created it, having a basic template helped me keep everything organized while I cut out the individual pieces of paper.
- Cut your scrapbook papers into the sizes and shapes you want.
- Glue the scrapbook paper together starting at the bottom of your layout and working to the top. For this style, I used one piece of paper as a frame. I added 3/4 of a page on top, and then slowly added the additional pieces until I had the layers I wanted.
- Cut a frame for the picture using a pair of scissors or a paper cutter. The frame should be about 1/4-inch larger than the actual picture. Glue the picture onto the frame.
- Place the frame on top of your paper layers in the spot you want.
- Add embellishments to the page. For this style, I used a simple piece of ribbon, but you can also add buttons, braids, bows, or stickers. If you use regular glue, allow everything to dry before you place it in the scrapbook or frame.
2. Knitted Baby Bootie Ornament
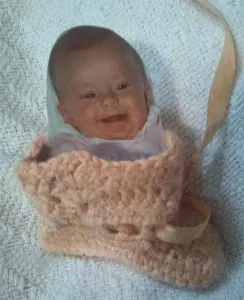
While you can buy an ornament frame, I chose to do something a little more unique, creating the ornament out of a baby bootie. For this project, I used a basic knit stitch alternated with a garter stitch, but any combination you like will work.
- blue or pink yarn
- 2 size-5 needles
- ribbon
- 1 photo
Directions:
- Measure the size of your baby’s foot. While it doesn’t have to be exact for an ornament, having a size in mind makes knitting easier.
- Cast on your first knitting line. Create a row of 25 basic knit stitches. Cast off and repeat with a row of garter stitches. Keep alternating rows until you have the basic shape of the bootie. Decrease the size of your rows to make an anklet.
- Following the pattern, make a second side to your bootie.
- Sew the two sides together. Since this was an ornament, I did not make a sole for the bootie, but instead sewed the two pieces together to create a two-dimensional shape.
- Wind ribbon through the back of the bootie. Tie the ribbon into a loop at the top to act as an ornament hanger.
- Cut the photo so that only your baby’s face appears.
- Place the photo inside the bootie.
3. Personalized Picture Frame
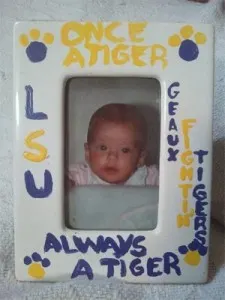
Add your own paint and embellishments to a picture frame for a classic gift with a more personal touch. For this frame, I chose a Louisiana State University theme as a gift for LSU alumni, but any theme will work.
Supplies:
- 1 plain ceramic or wood frame (plastic frames will not hold the paint well)
- ceramic paint in the color of your choice
- paintbrushes
- embellishments (optional)
Directions:
- Lay the frame on top of newspaper or drop cloths to protect your work surface from paint.
- Remove the plastic or glass picture cover on the photo holder. If you remove the cover before you paint, you don’t have to worry about spills ruining the cover.
- Trace the size and shape of the frame onto plain paper to create a template. You can use your template as a sort of guide. I drew my design on the template first and then used it as a visual for painting the frame. You can also use the template to create a stencil. To create a stencil, draw the design you want on the template, cut out the design, and apply it to the front of the frame. Then trace around the design with a pencil.
- Paint the frame following your template or stencil. Allow the paint to dry overnight.
- Add embellishments like glitter, ribbons, and jewels with a hot glue gun.
- Place your baby’s photo inside the photo holder. Place the plastic protective cover over the photo and close the back of the frame.
Final Thoughts
Give yourself plenty of time to complete your homemade Christmas presents.
You may need to set aside a little time every evening to work on your homemade crafts.
Don’t forget to personalize your Christmas gifts. You can add your baby’s name to each gift, or choose a theme that represents your family. I chose the LSU theme because my family members secretly hope every baby in the family will eventually attend LSU.
When you personalize your homemade gifts, you make them more than just Christmas presents – they’re keepsakes your friends and family members will treasure forever.
Angela Colley is a writer for Money Crashers, a personal finance blog that touches on subjects like budgeting, money management, family and home, and even the pros and cons of homemade baby food.


