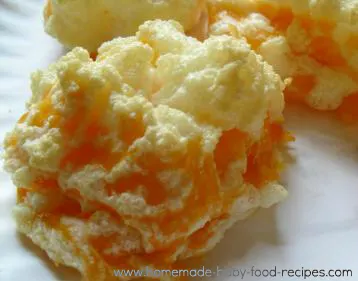
Here’s a fun idea for a finger food – little melt-in-the-mouth cheese meringues that are simple to put together and use only 2 ingredients!
We first made these when one of our older daughters was tiny, as we had a few spare egg whites leftover from a recipe that used only the yolks.
That same daughter is now 10 years old and was doing her OWN baking this weekend, when she handed us four egg whites left over from her recipe.
Those cheesy meringues sprang to mind once again, so we whipped up a batch and they went down incredibly well with our two-year-old!
These meringues are ideal for babies who have been safely introduced to whole eggs (more information about introducing eggs here) and are ready for finger foods or doing baby led weaning. They are very easy to eat, with a lightly crisp texture that truly does melt in baby’s mouth.
We recommend making these in the morning of the day on which you plan to serve them – we’ve never had much success with storing them. That could be down to the humidity here – trying to keep meringues crispy and fresh in the damp heat of a Bahamian summer is nigh on impossible! They may be easier to store in an airtight container if your climate is somewhat cooler and drier than ours.
In fact, if you succeed in keeping them fresh we’d love to know, so that we could provide a better recommendation for storage times!
So here’s how to make them…
To Make Cheese Meringues You Will Need…
4 egg whites
4 oz (1 cup) grated cheese – we used Cheddar
Preheat the oven to 250 deg F (130 deg C).
Whisk the egg whites in a bowl until they are COMPLETELY stiff – this means that you should be able to hold the bowl upside down and the egg whites should stay in the bowl. Make sure there’s no yolk in the whites at all or it can ruin your results.
Gently mix in the grated cheese (we say gently, because you don’t want to knock the air out of the egg whites).
Grease a baking sheet, then spoon the beaten egg whites into little ‘heaps’ on the sheet.
Place in the oven and bake for around 10 minutes – keep checking, as you want the meringues to become firm but not darken.
Switch off the oven and leave the meringues inside – this extended time in the heat completely dries them out and gives them their crisp texture. We left ours for 2 hours.
Serve just as they are!
More delicious baby food recipes with eggs
Please do let us know if your bub enjoys this cheesy treat!


Meghan
Saturday 28th of December 2013
Tried this this morning but with some tweaks: I finely grated the cheddar and mixed in a couple of teaspoons of arrowroot powder before folding in the beaten egg whites. I don't know if it helped at all but I like to imagine it made some difference with it keeping its shape?
Then with the yolks I made a mock hollandaise sauce (the yolk is where all the good fats and vitamins are!) by melting butter, tempering the yolks into them and adding some lemon juice and salt.
I called it "Clouds with sunshine sauce".
This is actually my new favorite egg dish I've ever had. I made it for the kids, but next time I make it for myself I'll have it over a bed of veggies. Good for any meal.
Woo hoo!!!
Anyhow - thanks for the recipe idea!
Jeanette
Thursday 12th of January 2012
My picky daughter loved these but they did not melt in her mouth. In fact she couldn't chew them at all. How do you suggest storing them? I think I ruined the texture by storing them in a plastic bag in the fridge. Before serving I would lightly toast to dry out but didn't seem to go over well. Loves the taste though. I'm going to try another batch tonight.
Christine
Thursday 12th of January 2012
I'm afraid - as we mentioned in the post itself - we didn't have much luck storing them either - we actually recommend making them with the intention of serving them asap. For us, humidity is a real issue (the plastic bag probably had the same effect). They were lovely and crisp and 'melty' at first, but softened considerably after a few hours. For us, they didn't even last in an airtight container! They're probably best made to eat there and then, but if you have success in storing your next batch then please let us know :) Glad your little one loved the flavour!